![]()
Introduction to Cap Barbell Power Rack Assembly
The Cap Barbell Power Rack is a staple in many home gyms, offering a versatile and sturdy solution for various strength training exercises. Assembling this piece of equipment correctly is essential to ensure safety and functionality. The history of power racks dates back to the mid-20th century when strength training became more structured and equipment-specific. The Cap Barbell Power Rack continues this tradition, providing a reliable framework for lifting.
Overview of the Cap Barbell Power Rack
The Cap Barbell Power Rack is designed to support a wide range of exercises, from squats to bench presses. Its robust construction and adjustable features make it suitable for users of all fitness levels. The rack typically includes safety bars, J-hooks, and additional attachments for enhanced workout versatility. Understanding the components and their functions is the first step toward a successful assembly.
Importance of Proper Assembly
Proper assembly of the Cap Barbell Power Rack is crucial for ensuring user safety and equipment longevity. Incorrect assembly can lead to instability, increasing the risk of accidents and injuries. Following the manufacturer’s instructions meticulously and using the right tools will help achieve a secure and stable setup. Historical data shows that well-assembled equipment significantly reduces the likelihood of workout-related injuries.
Tools and Materials Needed
Before starting the assembly, gather all necessary tools and materials. This preparation will streamline the process and prevent unnecessary interruptions. Typically, the following tools are required:
• Wrench Set: Essential for tightening bolts and nuts.
• Screwdriver: Needed for securing various components.
• Rubber Mallet: Useful for gently tapping parts into place.
• Measuring Tape: Ensures accurate alignment of parts.
• Protective Gloves: Protects hands during assembly.
Having these tools on hand will make the assembly process smoother and more efficient.
Step-by-Step Assembly Instructions
Unpacking and Organizing Parts
Begin by unpacking all the components and organizing them systematically. This step helps in identifying each part and ensures nothing is missing. Lay out the parts on a clean, flat surface and cross-check them with the parts list provided in the manual. This initial organization will save time and reduce confusion during assembly.
Assembling the Base and Uprights
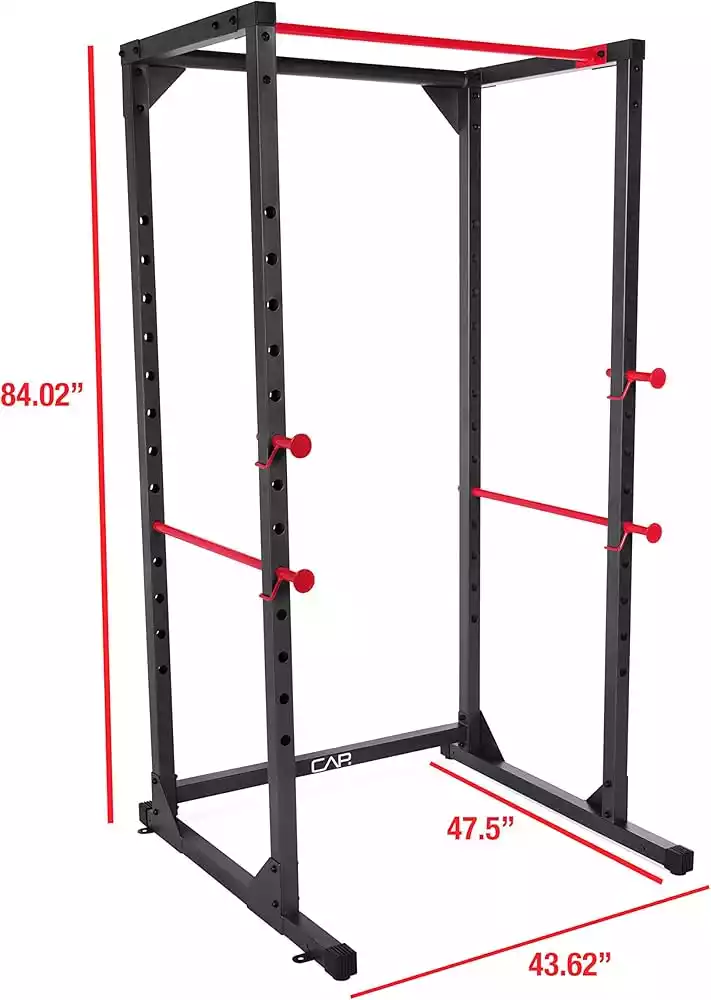
1. Position the Base: Start with the base frame, ensuring it is level and stable. Use the measuring tape to verify the correct dimensions.
2. Attach the Uprights: Secure the uprights to the base using the bolts and nuts provided. Tighten them with a wrench, ensuring they are firmly in place.
3. Install the Crossbars: Connect the crossbars to the uprights, providing additional stability to the structure. Use the rubber mallet if necessary to fit the parts snugly.
Following these steps will create a solid foundation for the power rack.
Safety Tips and Precautions
Ensuring Stability and Balance
Stability is paramount when using a power rack. Ensure the rack is placed on a flat, non-slip surface. Regularly check and tighten all bolts and nuts to maintain structural integrity. Using weight plates to anchor the base can also enhance stability.
Regular Maintenance and Inspection
Routine maintenance is essential for the longevity of the power rack. Inspect the equipment regularly for any signs of wear or damage. Lubricate moving parts to ensure smooth operation. Address any issues immediately to prevent accidents.
Troubleshooting Common Issues
Misalignment of Parts
Misalignment can occur if parts are not assembled correctly. Double-check the alignment of all components during assembly. If misalignment persists, disassemble the affected parts and reassemble them carefully, ensuring proper alignment.
Loose Bolts and Screws
Loose bolts and screws can compromise the stability of the power rack. Regularly inspect and tighten all fasteners. Using thread-locking adhesive can prevent bolts from loosening over time.
Enhancing Your Workout Experience
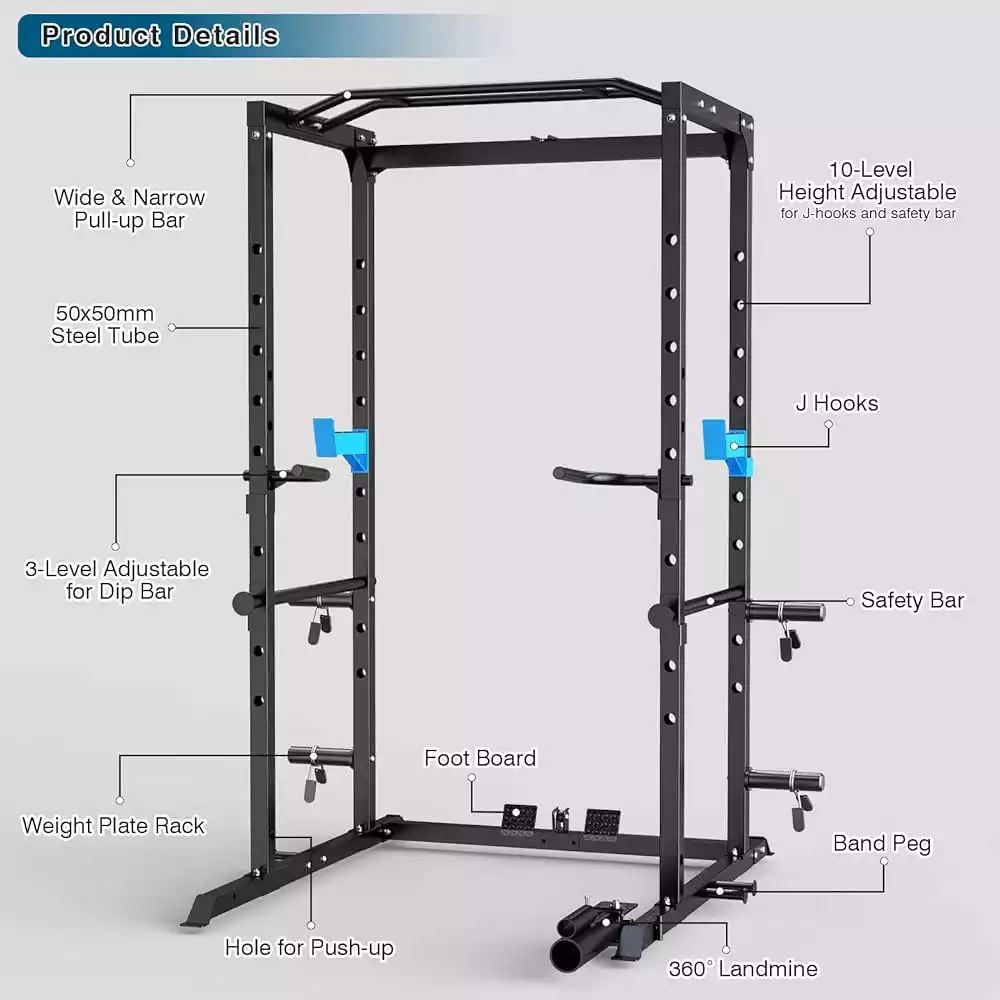
Accessory Attachments
The Cap Barbell Power Rack can be customized with various attachments to enhance your workout experience. Attachments such as dip bars, pull-up bars, and landmine attachments can add versatility to your training routine. Ensure all attachments are securely fastened before use.
Recommended Exercises
The power rack supports a wide range of exercises, including:
• Squats: Utilize the safety bars for added security.
• Bench Press: Adjust the J-hooks to the appropriate height.
• Pull-Ups: Use the pull-up bar for upper body strength training.
Incorporating these exercises into your routine can help achieve a well-rounded fitness regimen.
Relevant Data Table For The Cap Barbell Power Rack Assembly Instructions:
| Step | Description | Tools Required | Estimated Time |
| 1 | Unpacking and Organizing Parts | None | 15 minutes |
| 2 | Assembling the Base | Wrench, Screwdriver | 30 minutes |
| 3 | Attaching the Uprights | Wrench, Screwdriver | 20 minutes |
| 4 | Securing the Top Frame | Wrench, Screwdriver | 25 minutes |
| 5 | Final Tightening and Inspection | Wrench, Screwdriver | 10 minutes |
FAQs:
What should I do if parts are missing?
If you discover that parts are missing during the assembly of your Cap Barbell Power Rack, the first step is to double-check the packaging and the parts list provided in the manual. Sometimes, smaller components can be overlooked or hidden within the packaging materials. If you confirm that parts are indeed missing, contact the retailer or manufacturer immediately. Provide them with the model number and a detailed description of the missing parts. Most manufacturers have a customer service department that can assist with replacement parts. It’s important to address this issue promptly to avoid delays in your assembly process.
How often should I inspect the power rack for safety?
Regular inspection of your Cap Barbell Power Rack is essential to ensure its safety and functionality. It’s recommended to perform a thorough inspection at least once a month. Check all bolts and nuts to ensure they are tight and secure. Look for any signs of wear or damage, particularly on moving parts and weight-bearing components. Lubricate any moving parts to maintain smooth operation. Additionally, inspect the rack before each use to ensure there are no immediate safety concerns. Regular maintenance and inspection will help prolong the life of your equipment and ensure a safe workout environment.
Can I assemble the power rack alone, or do I need assistance?
While it is possible to assemble the Cap Barbell Power Rack alone, having assistance can make the process easier and safer. Some components may be heavy or awkward to handle alone, and having an extra pair of hands can help with alignment and stability during assembly. If you choose to assemble the rack alone, take your time and follow the instructions carefully. Use tools like clamps or temporary supports to hold parts in place while you secure them. Safety should always be a priority, so don’t hesitate to ask for help if needed.
What exercises can I perform with the Cap Barbell Power Rack?
The Cap Barbell Power Rack is a versatile piece of equipment that supports a wide range of exercises. Some of the most common exercises include:
• Squats: Use the safety bars for added security.
• Bench Press: Adjust the J-hooks to the appropriate height.
• Pull-Ups: Utilize the pull-up bar for upper body strength training.
• Deadlifts: Perform deadlifts within the rack for added safety.
• Overhead Press: Use the rack to support the barbell during overhead presses.
Incorporating these exercises into your routine can help achieve a well-rounded fitness regimen. The power rack’s versatility makes it a valuable addition to any home gym.
How do I maintain the Cap Barbell Power Rack?
Maintaining your Cap Barbell Power Rack involves regular inspection and upkeep. Check all bolts and nuts regularly to ensure they are tight and secure. Lubricate moving parts to maintain smooth operation. Clean the rack periodically to remove dust and debris. Inspect the rack for any signs of wear or damage, particularly on weight-bearing components. Address any issues immediately to prevent accidents. Regular maintenance will help prolong the life of your equipment and ensure a safe workout environment.
Conclusion:
Assembling the Cap Barbell Power Rack correctly is essential for ensuring safety and functionality. By following the detailed instructions and using the right tools, you can create a stable and reliable setup for your strength training exercises. Regular maintenance and inspection will help prolong the life of your equipment and ensure a safe workout environment. Incorporating a variety of exercises into your routine can help achieve a well-rounded fitness regimen. For more detailed instructions, you can refer to the Cap Strength FM-CS7000F-2 Manual and watch this assembly video.
Posts References:
Fuel Pureformance/CAP Barbell 6′ Power Rack Unboxing, Assembly …
Cap strength FM-CS7000F-2 Rack Stand Manuals – ManualsLib