Squats are one of the most effective exercises for building lower body strength, muscle, and overall fitness. When you use a power rack for squats, you gain safety, confidence, and the ability to push your limits with less risk of injury. But not everyone knows how to use a power rack correctly, especially if you are new to the gym or have only seen others using it. Understanding the right way to use a power rack for squats can make a big difference in your results and help you avoid common mistakes that slow progress or lead to injury.
This guide will show you step-by-step how to use a power rack for squats. You will learn about rack setup, safety, correct squat form, and tips that even many experienced lifters miss. We will also cover common mistakes, how to choose the right rack height, and ways to keep improving over time.
Whether you are a beginner or want to improve your squat technique, you will find everything you need to use a power rack confidently.
What Is A Power Rack And Why Use One?
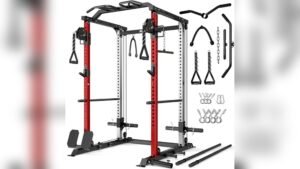
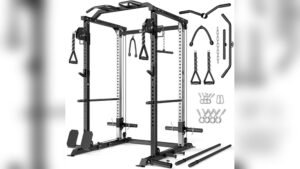
A power rack is a strong, metal frame with four vertical posts and adjustable hooks or pins. It is designed for barbell exercises, especially squats, bench presses, and overhead presses. The main advantage of a power rack is safety. It lets you squat heavy weights alone, catch the bar if you fail, and set the bar at the perfect height for your body.
People use power racks because:
- They allow you to lift heavier weights safely.
- You can train without a spotter.
- They help you practice proper form.
- You can set safety pins to prevent injury if you drop the bar.
For squats, a power rack is a must if you want to progress and avoid common injuries that happen when lifting heavy outside a rack.
Setting Up The Power Rack For Squats
Before you squat, you must prepare the power rack for your body and safety needs. Here is what you should do:
1. Adjust The J-hooks
J-hooks are the arms that hold the barbell. Set them at chest level, just below your shoulders, so you can easily unrack the bar without standing on your toes or bending too much. Most people set the hooks at the height where the bar is just below the top of their shoulders. If the hooks are too high, you will struggle to lift the bar out. If too low, you will waste energy bending down.
2. Set The Safety Pins
Safety pins or bars are your last line of defense if you cannot finish a squat. Place them just below the lowest point of your squat, about an inch lower than where your hips will be at the bottom. This way, if you fail, the bar lands on the pins, not on you. Test the height with an empty bar before adding weight.
3. Load The Barbell
Always add weight plates evenly on both sides and secure them with collars or clamps. This keeps the bar stable and safe during squats. Never skip the collars, even if you think the weights are light.
4. Clear Your Area
Check that the area around the rack is clear of weights, benches, or anything you might trip over. Good preparation prevents accidents.

Credit: selectfitness.com
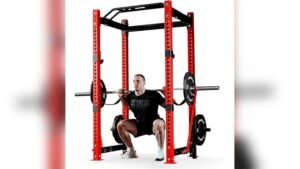
Correct Bar Placement And Unracking
Proper bar position on your back is critical for safe and effective squats. There are two main types:
- High-bar position: The bar rests on your upper traps, just below your neck. Common for Olympic-style squats.
- Low-bar position: The bar sits lower, across the rear deltoids and upper back. Often used for powerlifting.
Beginners usually find the high-bar position more comfortable and easier for learning the movement. Whichever you choose, the bar should feel stable and not pinch your neck or roll down your back.
How To Unrack The Bar
- Stand under the bar with your feet shoulder-width apart.
- Place your hands evenly on the bar, usually just outside your shoulders.
- Squeeze your shoulder blades together and keep your chest up.
- Take a deep breath, brace your core, and stand up to lift the bar off the hooks.
- Take 1-2 small steps back to clear the hooks before you start your squat.
Never take big steps backward, as this wastes energy and increases your risk of tripping.
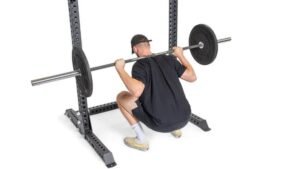
Performing The Squat Inside A Power Rack
Now you are ready to squat. Here is a step-by-step guide for good form:
- Feet Position: Place your feet shoulder-width apart, toes slightly pointed out.
- Grip: Hands firm on the bar, elbows under the bar, chest up.
- Breathing: Take a deep breath and brace your abs.
- Descent: Push your hips back and bend your knees to lower your body. Keep your chest up and back straight.
- Depth: Lower yourself until your thighs are at least parallel to the floor. Deeper squats use more muscle, but only go as low as your form allows.
- Ascent: Push through your heels, drive your hips up, and stand back up. Breathe out as you rise.
- Rack the Bar: After your set, walk forward and gently place the bar onto the hooks.
Key Squat Cues
- Knees out: Do not let your knees collapse inward.
- Chest up: Prevents your back from rounding.
- Heels down: Avoid lifting your heels off the floor.
Many beginners forget to brace their core or rush the descent, which can lead to poor form or injury.

Credit: selectfitness.com
Safety Features And How To Use Them
Power racks come with several safety features. Understanding these can prevent most injuries.
| Feature | Main Purpose | How to Use |
|---|---|---|
| Safety Pins/Bars | Catch the bar if you fail | Set just below lowest squat point |
| J-Hooks | Support the bar before/after lifting | Adjust to upper chest height |
| Pull-up Bar | Extra exercises (not for squats) | Use for warm-ups or upper body training |
Make sure you know how to bail safely. If you cannot stand up with the weight, drop your hips, lean forward, and let the bar rest on the safety pins. Practice this with an empty bar so you are ready if it happens during a heavy lift.
Common Mistakes When Using A Power Rack For Squats
Even experienced lifters make mistakes in the power rack. Here are some you should avoid:
- Setting pins too low: If the safety pins are too low, they will not catch the bar if you fail. Always test with an empty bar first.
- Unracking with a rounded back: This can strain your spine. Keep your back straight and core tight.
- Not using collars: Plates can slide off if you tilt the bar, causing injury.
- Taking too many steps back: This wastes energy and increases the risk of tripping.
- Squatting outside the rack: Never squat in front of the rack for ego. Always stay inside for safety.
- Ignoring warm-up: Cold muscles get injured more easily. Warm up with bodyweight squats or light sets first.
- Uneven bar placement: If the bar is not even on your back, your squat will be unbalanced.
One non-obvious mistake is not adjusting the rack for different lifters. If you share a rack, always check the settings before you start.
Choosing The Right Power Rack Settings
Not all power racks are the same. Some have small adjustment holes, while others have larger gaps. Picking the right settings can change your squat experience.
| Setting | Best For | Adjustment Tip |
|---|---|---|
| J-Hook Height | Easy unracking | Set just below shoulder |
| Pin Height | Safety during fails | Test with empty bar |
| Bar Position | Comfort and power | High-bar for beginners |
If you are short or tall, you may need to experiment to find the best setting. Always pick the lower height if unsure; you can stand up more easily than squat down too low.
Practical Tips To Improve Your Squat In The Rack
- Film your sets: Watching your squat can reveal form problems you do not feel during the lift.
- Use proper shoes: Squat in flat shoes or lifting shoes, not running shoes. This gives more stability.
- Progress slowly: Add weight in small steps, like 5-10 pounds per week, to avoid injury.
- Keep records: Track your weights and reps. This helps you see progress and plan workouts.
- Ask for feedback: If your gym has trainers, ask for a quick check on your form.
A beginner insight: Many people try to copy advanced lifters’ techniques. Start with basic form and build a strong foundation before making changes.
Advanced Power Rack Squat Variations
Once you master the basic squat, you can try variations to target different muscles or add challenge.
- Pause squats: Pause at the bottom for 2-3 seconds before rising. This increases strength and control.
- Box squats: Place a sturdy box or bench behind you and sit back onto it, then stand up. This helps with squat depth and hip drive.
- Pin squats: Start the bar from the safety pins (at the bottom of your squat). This builds power from the hardest part of the lift.
- Tempo squats: Lower slowly (3-5 seconds) and rise quickly. Improves stability and muscle growth.
These variations prevent plateaus and make your workouts more interesting.
Comparing Power Rack Squats To Other Squat Methods
How does squatting in a power rack compare to other squat methods, like using a Smith machine or free-standing squats? Here is a simple comparison:
| Method | Safety | Muscle Activation | Best For |
|---|---|---|---|
| Power Rack | High | High | Strength, Progression |
| Smith Machine | Medium | Medium | Rehab, Beginners |
| Free Squat | Low | High | Bodyweight, Technique |
Power racks offer the best balance of safety and muscle activation, making them the top choice for most lifters.
Progressing Over Time
Building strength with squats is about consistency. Stick to a routine, increase weights slowly, and focus on good form. If you stall, try changing your rep range or rest periods. For example, do 3 sets of 5 reps with heavier weights, then 4 sets of 8 reps with lighter weights the next week.
Recovery matters too. Rest at least 48 hours between squat days to let your muscles grow and recover.
Frequently Asked Questions
How High Should I Set The Safety Pins In A Power Rack?
Set the safety pins just below the lowest point of your squat. Test with an empty bar to make sure you can squat fully, but the pins will catch the bar if you cannot stand up. If in doubt, set them slightly higher for your first few workouts and adjust as needed.
Can I Use A Power Rack For Exercises Other Than Squats?
Yes, power racks are versatile. You can do bench presses, overhead presses, rack pulls, and even pull-ups if your rack has a pull-up bar. Always adjust the safety pins and hooks for each exercise.
What Shoes Are Best For Squatting In A Power Rack?
Use flat-soled shoes or weightlifting shoes. Avoid running shoes, as their soft soles make you unstable. Converse Chuck Taylors or dedicated lifting shoes are popular choices.
How Much Weight Should I Start With In The Power Rack?
Start with just the empty bar (usually 45 pounds/20 kg) to practice form. Add weight in small steps, like 10-20 pounds at a time, as your technique improves. Never rush to lift heavy before you master proper squat mechanics.
Is It Safe To Squat Alone In A Power Rack?
Yes, squatting alone is safe if you use the power rack’s safety pins correctly. Always check your setup before lifting. For extra safety, let someone in the gym know you are training heavy, or keep your phone nearby in case of emergency.
Using a power rack for squats is one of the smartest choices for anyone serious about strength and safety. With the right setup, good technique, and steady progress, you will see strong results and avoid common setbacks. For more details on squat form and safety, you can check resources like Wikipedia’s Squat Exercise page.
Start light, focus on perfect form, and use the power rack as your best training partner. Your legs, core, and confidence will thank you.

Credit: lipsticklifters.com